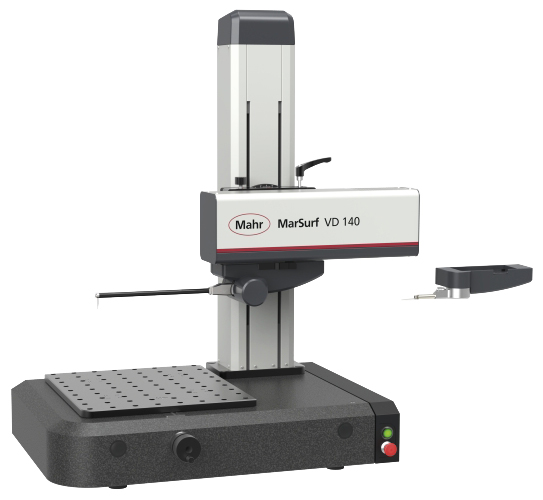
MarSurf VD280
|
MarSurf VD 280
|
MarSurf VD 140
|
|
|
Start of traversing length (in X)
|
0 mm
|
0 mm
|
|---|---|---|
|
End of traversing length (in X)
|
280 mm
|
140 mm
|
|
Positioning speed
|
0.02 - 200 mm/s (in X)
|
0.02 - 200 mm/s (in X)
|
|
Guide deviation
|
0.07 µm / 20 mm (with probe system BFW 250)
0.35 µm / 60 mm 0.4 µm / 140 mm |
0.07 µm / 20 mm (with probe system BFW 250)
0.35 µm / 60 mm 0.4 µm / 140 mm |
|
Measuring speed
|
Up to 10 mm/s
|
Up to 10 mm/s
|
|
Measuring range mm
|
with probe system BFW 250
500 µm (±250 µm) for probe arm length 45 mm 1500 µm (±750 µm) for probe arm length 135 mm with probe system C 11 70 mm with probe arm length 350 mm max. 100 mm with probe arm length 490 mm |
with probe system BFW 250
500 µm (±250 µm) for probe arm length 45 mm 1500 µm (±750 µm) for probe arm length 135 mm with probe system C 11 70 mm with probe arm length 350 mm max. 100 mm with probe arm length 490 mm |
MarSurf VD Series - The MarSurf family is complemented:
The easy change between roughness and contour tracing system
Depending on the measuring task, either the BFW roughness probe system for surface roughness or the C 11 contour probe system for contour measurements can be changed by the operator (hot-plug capable). The new system offers the advantages of combining the highly dynamic C 11 contour probe system with the high-precision BFW probe system, which is particularly suitable for fine surfaces.
The new measuring station concept combines speed, reliability and flexibility • The aim is to increase the profitability of the system for your company • The measuring stations are operated with the user-friendly MarWin software (MarWin EasyRoughness & Contour or MarWin Professional Roughness & Contour).
Innovative technologies:
Fast axes
Positioning speeds up to 200 mm/s in X • Contour measurements are 25 x faster than with its predecessor MarSurf PCV or MarSurf CD 120 • Surface measurements are 40 x faster than with the MarSurf GD 120 • By default, the Z-axis is fully CNC-capable • The Z-axis is approx. twice as fast as previous Mahr Z-axes • Up to 5 times faster than standard Z-axes on the market • Two reference probe systems for your measuring tasks
Contour probe system C 11
Probe arm recognition via integrated chip • Standard measuring range up to 70 mm; Max. 100 mm with 490 mm probe arm length • Magnetic probe arm holder, probe arm change without tools • The touch probe combines robustness with dynamics • Optional: Possibility to extend the roughness value determination to contours
Roughness probe system BFW
Easy probe arm change and probe arm protection by means of magnetic probe arm holder • Probe arm mount allows the change from standard to transverse measurement without tools or adapter • Extensions for the probe system possible
Innovative workpiece clamping system
Mounting plate 390 x 430 mm with hole dimension 50 mm • Integrated 60 mm TY adjustment • The combination of mounting plate and integrated TY adjustment makes an additional XY table superfluous • Low workpiece setup supports a favorable short measurement loop, which has a positive effect on the measurement results
Applications
Machine building Bearings, threads, threaded rods, ball screws, shafts, racks
Metrology close to production Contour measurement in a semi-automatic process
Automotive industry Steering, brake system, gearbox, crankshaft, camshaft, cylinder head
Medicine Contour measurement for hip and knee endoprostheses, medical screws, dental implants


